Lithophane Thickness Calibration Tile
Description
PDFThis is a calibration tile for finding the "maximum thickness" to enter into lithophane generators like lithophanemaker.com or 3dp.rocks.
Values of 3-4mm usually work well, but since every filament absorbs light differently, you might want to run a quick test before spending hours printing a whole lithophane only to find that it's too dark to see anything or too light to get a nice contrast.
That's where this print comes in.
Using only 5 grams of filament and printing in just 30 minutes using the settings below, it quickly gives you an idea how much light the filament absorbs at different thicknesses.
Features:
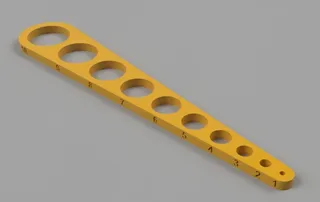
- Each "block" is a different thickness, ranging from 0.5mm up to 7.0 mm. The number on each block gives the thickness in mm.
- The numbers are cut 0.5 mm deep into the block. This gives you an indication of how much contrast you'll get at each thickness. You'll notice that the thicker the block, the worse the contrast gets vs. the numbers
- The decimal point of each number is cut almost the full depth of the block, leaving just 0.5mm of plastic at the back. This gives you an indication of the maximum contrast possible at each thickness (the dot is the lightest colour possible, while the block is the darkest colour possible, at each particular thickness). You'll notice that the thicker the block the better the contrast gets vs. the decimal point.
The only exception to the above is the 0.5mm tile. Since following the same rules would result in holes instead of numbers, I have instead extruded the text outwards by 0.5mm from the tile face. This tile serves more to fine-tune your temperature and single-extrusion settings than thickness testing ;). After printing, try and choose a thickness where you get the best balance of contrast between all the elements in the tile. Use that as your "max thickness" in lithophane generators.
Commercial use allowed :)
If this tool helps you make your lithophanes awesome, please donate a few cents using the thingiverse tipping feature to help me fund my 3D-printing addiction! Thank you :)
Print Settings
Printer Brand:
Creality
Printer:
CR-10 Mini
Rafts:No
Supports:
No
Resolution:0.2mm
Infill:
99% linear
Filament:
See pic PLA White
Notes:
I recommend 3 perimeters or more, and 99% or 100% infill.
Print upright, as you would a lithophane. The STL is already oriented correctly for you. It takes 24 minutes to print at 75mm/s and around 30 minutes to print at 60mm/s.How I Designed This
Fusion 360
Designed with Fusion 360.
Category: 3D Printing TestsTags
Model origin
The author marked this model as their own original creation. Imported from Thingiverse.


